Exporting is the process of saving organization charts in data formats that can be opened and utilized by other programs. In OrgChart, this is done through the Export Wizard. The wizard can export to the following formats:
- Comma Separated Values (CSV) File.
- Microsoft Excel.
- XML Document (OrgChart Schema).
- OLE DB DataSource.
The export process is virtually identical for all these formats. The only exception is during the path selection phase, which appears on the third screen of the Export Wizard. At that stage, Excel and OLE DB DataSource have a different selection process.
To launch the Export Wizard go to [File tab] Export.
Export Wizard: Introduction screen

To complete this screen, choose one of the following options:
- Check the Do not show this page again box if you do not wish the introduction screen to appear next time the wizard is launched.
- Next – proceed to the next screen.
- Cancel – close the wizard without saving and return to the Main Work area.
- Help – launch the OrgChartHelp system.
Export Wizard: Select export format
This screen offers various export options (see below).

Click a radio button to choose the desired export format.
To complete this screen, choose one of the following options:
- Back – return to the previous wizard screen.
- Next – proceed to the next screen.
- Cancel – close the wizard without saving and return to the Main Work area.
- Help – launch the OrgChartHelp system.
Export Wizard: Select export path (CSV, Excel and XML only)
This page appears if CSV, Excel or XML is chosen. It sets the location path to where the document will be exported (see below).

The path selection process differs slightly depending on the format type:
Comma Separated Values (CSV) File and XML Document (OrgChart Schema):
- Left mouse click the Browse button. The Browse for Folder menu appears:
- Use the Browse for Folder screen to set a destination folder and click OK.
- The export path will be displayed in the Export Wizard.
Export Wizard: Microsoft Excel File
- Left mouse click the Browse button. The Save As menu will appear (see below):

- Browse to a location and set a file name. Click Save.
- The export path will be displayed in the Export Wizard.
To complete this screen, choose one of the following options:
- Back – return to the previous wizard screen.
- Next – proceed to the Select data source screen.
- Cancel – close the wizard without saving and return to the Main Work area.
- Help – launch the OrgChartHelp system.
Export Wizard: Data Source screen (OLE DB DataSource only)
This screen appears when OLE DB DataSource is selected (see below).

Choose one of the two following methods to set the DataSource:
- Use connection string
- Choose this radio button and click the Build button. The Data Link Properties menu will appear (see below).
- Choose the correct OLE DB Providers. If necessary navigate to each area by either clicking Next or selecting the appropriate tabs. When all the areas are completed click OK.
- The provider will appear in the Use connection string field.

- Use Universal Data Link (UDL) File
- Click the Build button. The Open menu will appear.
- Browse to a location and set a file name. Click Open.
- The file will appear in the Use Universal Data Link (UDL) File field.
To complete this screen, choose one of the following options:
- Back – return to the previous wizard screen.
- Next – proceed to the Select data source screen.
- Cancel – close the wizard without saving and return to the Main Work area.
- Help – launch the OrgChart Help system.
Export Wizard: Select data source screen
This page sets exactly what data is going to be exported (see below).
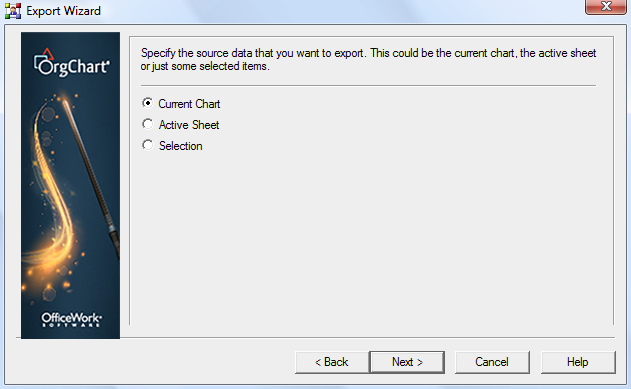
Choose from one of the following options:
- Active chart – exports the entire chart and all additional (hidden) division sub-charts.
- Active sheet – exports only the currently displayed sheet.
- Selection only – exports only the components which are currently highlighted.
To complete this screen, choose one of the following options:
- Back – return to the previous wizard screen.
- Next – proceed to the Set data fields screen.
- Cancel – close the wizard without saving and return to the Main Work area.
- Help – launch the OrgChartHelp system.
Export Wizard: Select data fields
This screen sets which data fields will be exported (see below).
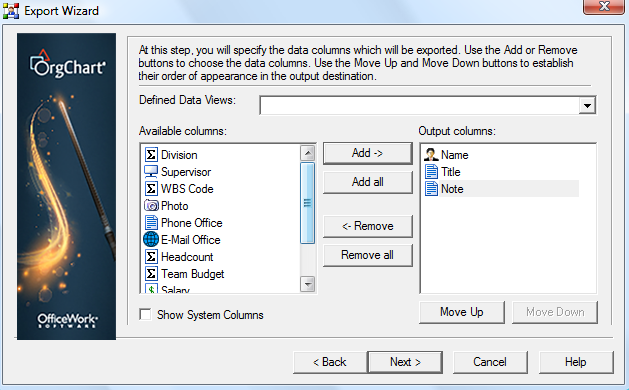
Data fields are chosen by making selections from the Available columns paneand transferring them to the Output columnspane.
To move items between panes simply highlight a selection and use the appropriate button. The following options are available:
- Add – moves a selection from the Available columns pane to the Output columns pane.
- Add all – moves all the selections from the Available columns pane to the Output columns pane.
- Remove – moves a selection from the Output columns pane to the Available columns pane.
- Remove all – moves all the selections from the Output columns pane to the Available columns pane.
The following options are available in the Output columns pane only:
- Move Up – moves an item higher on the list. This option is inactive if the selection is already at the top.
- Move Down – moves an item lower on the list. This option is inactive if the selection is already at the bottom.
To complete this screen, choose one of the following options:
- Back – return to the previous wizard screen.
- Next – proceed to the next wizard screen.
- Cancel – close the wizard without saving and return to the Main Work area.
- Help – launch the OrgChartHelp system.
Export Wizard: Select data set title
This page sets the data set title for your exported document (see below).
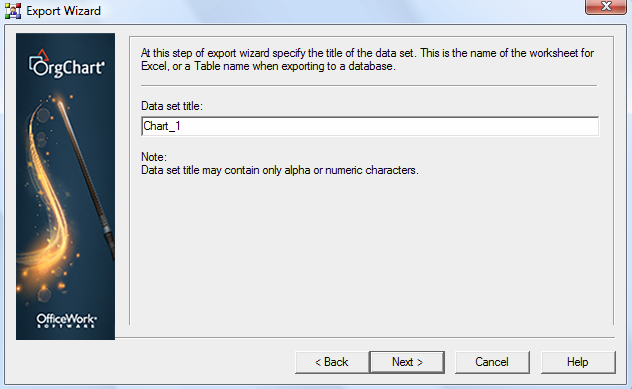
To use, simply type the title into the Data set title field.
- Back – return to the previous wizard screen.
- Next – proceed to the Progress indicator screen.
- Cancel – close the wizard without saving and return to the Main Work area.
- Help – launch the OrgChartHelp system.
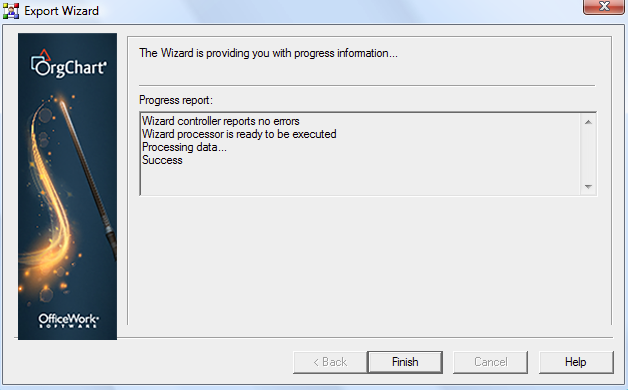
Export Wizard: Progress screen
This screen activates automatically after the previous wizard screen is completed. This page reports the progress of your export (see below).

To complete this screen, choose one of the following options:
- Back – return to the previous wizard screen.
- Next – proceed to the Results screen.
- Cancel – close the wizard without saving and return to the Main Work area.
- Help – launch the OrgChartHelp system.
Export Wizard: Results screen
This screen displays the results of your export (see below).
The following areas and options are present on this page:
- Results report – displays the results of your export.
- Errors report – displays any errors that may have occurred during the export process.
- Details – click this button for any additional information which may be available regarding the export of your document.
To complete this screen, choose one of the following options:
- Finish – complete the wizard and return to the Main Work area.
- Cancel – close the wizard and return to the Main Work area.
- Help – launch the OrgChartHelp system.